Enter your window Height
Measure the length (vertical drop) from the top of the architrave to where you would like the blind to end.
Enter your window Width
 Face or reveal
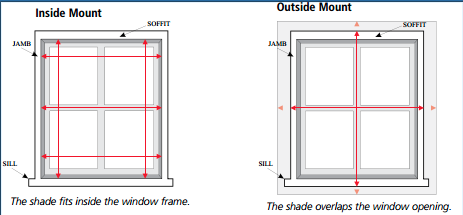
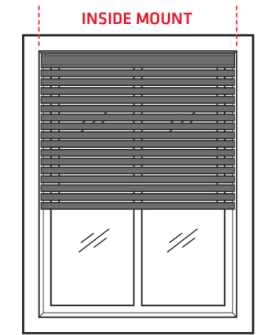
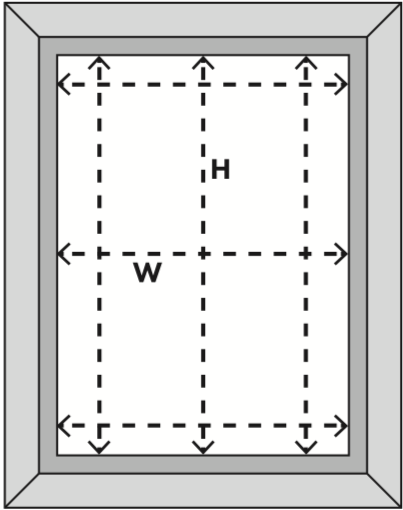
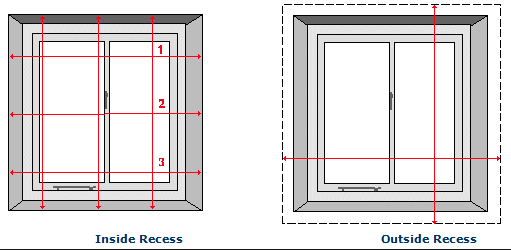
"Inside Window Frame" means installing the blind on the inside of the window/door frame, in the window reveal or into the ceiling. Also referred to as reveal.
Installing Inside Window Frame:
Measure the inside of the window frame from left to right in 3 different places and use the longest measurement.
Depth Required is the clearance needed from the front to the back of your window reveal for uninterrupted operation of the blind. Please also take into account any window handles or other obstructions that may interfere with the blind.
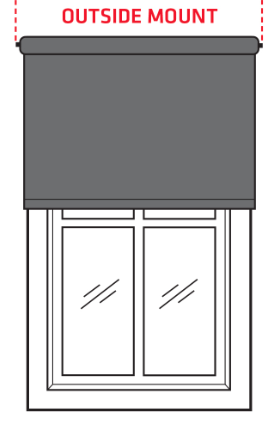
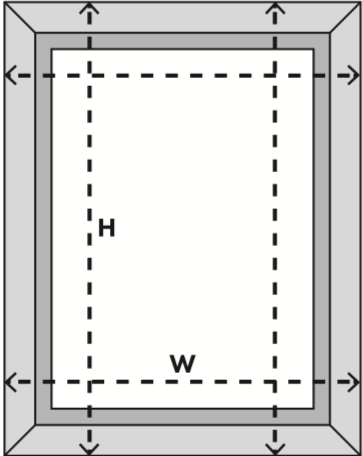
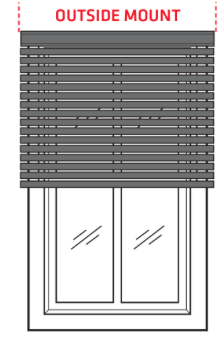 "Outside Window Frame" means installing the blind on the outside of the window/door frame. Also referred to as face fix.
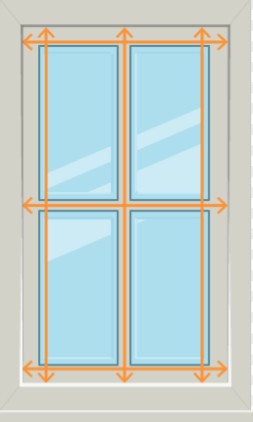
Installing Outside Window Frame:
Measure the exact width of the area you would like the blind to cover.
Room Name:
Enter a Room Name to identlfy the blinds when they arrive.
roller blinds width info
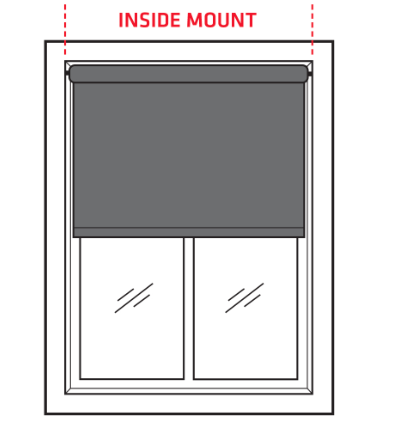 Installing Inside Window Frame:
Provide the Width of the Window Opening. Measure the inside of the window frame from left to right at the top of the window opening.
For the blinds to sit snuggly inside your window reveal, you will require a depth of 75mm. However, you will still be able to install your blind inside the reveal with a minimum depth of 40mm, which will result in the blind tube (at the top) slightly protruding from the window reveal.
Installing Outside Window Frame:
Provide the Width from outside Bracket to Bracket. Measure from the outside of where the bracket will sit to the outside of the opposite bracket (normally outside of architrave to architrave). If you do not have an architrave we recommend the blind overlaps the window by at least 50mm on each side.
roller blinds height info
 Installing Inside Window Frame:
Provide the Height of the Window Opening. Measure the inside of the window frame from top to bottom in the centre.
 Installing Outside Window Frame:
Provide the Height from the top to bottom of the blind and brackets. Measure the exact Height of the area you would like the blind and brackets to cover (normally top of architrave to bottom of architrave). If you do not have an architrave we recommend the blind overlaps the window by at least 50mm top and bottom.
venetians height info
Measure the length (vertical drop) from the top of the architrave to where you would like the blind to end.
venetians width info
Face or reveal
"Inside Window Frame" means installing the blind on the inside of the window/door frame, in the window reveal or into the ceiling. Also referred to as reveal.
Installing Inside Window Frame:
Measure the inside of the window frame from left to right in 3 different places and use the longest measurement.
Depth Required is the clearance needed from the front to the back of your window reveal for uninterrupted operation of the blind. Please also take into account any window handles or other obstructions that may interfere with the blind.
"Outside Window Frame" means installing the blind on the outside of the window/door frame. Also referred to as face fix.
Installing Outside Window Frame:
Measure the exact width of the area you would like the blind to cover.
plantation shutters width info
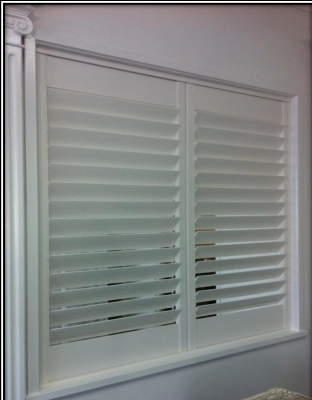
Reveal
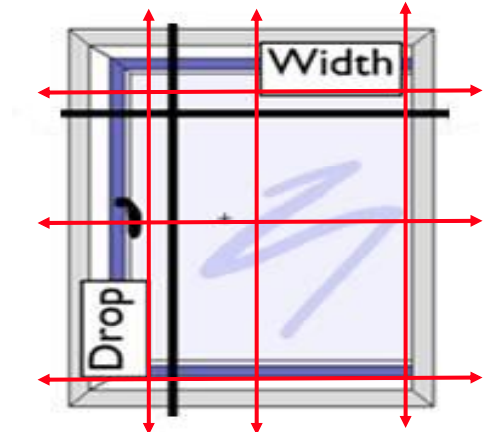
In this scenario, the shutter will sit inside the window frame. This is generally considered the most modern, streamlined, mounting option 1.1 Measure the width (W) inside the window frame from one edge to the other at the top, middle, and bottom of the window frame. Record the smaller of the three measurements. 1.2 Measure the height (H) from the top edge to the bottom edge in the left, middle and right side of the window frame. Record the smaller of the three measurements. 1.3 Measure the minimum depth of the window frame. Refer to the section below for minimums requirements.
Note:
- The minimum depth is the smallest distance to the outside edge of the frame including any objects in the window such as handles or sliding door frames.
- The minimum depth needed for inside mount depends on the blade size of the shutter
- 63mm blade size = 55mm minimum depth
- 89mm blade size = 68mm minimum depth
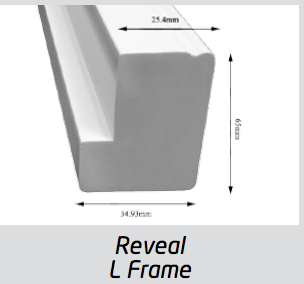
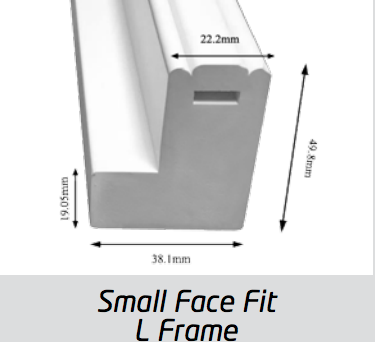
Facefit Mount (with Architraves)
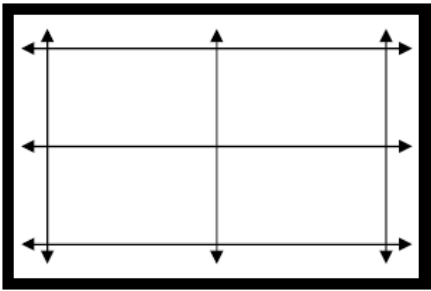
In this scenario, the shutter L-Frame will attach on top of the exiting architraves. 2.1 Measure the width (W) from one edge to the other at the top and bottom of the window to ensure the architraves are parallel. If the difference between the measurements is more than 5mm, shutter will not be a suitable option. 2.2 Measure the height (H) from one edge to the other on both the left and right of the window frame. If the difference between the measurements is more than 5mm, shutter will not be a suitable option.
Facefit Mount (No Architraves)
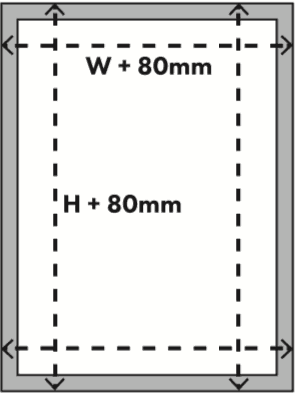
In this scenario, the shutter L-Frame will attach directly to the wall around the window 3.1 Measure the width (W) inside the top and bottom of the window frame from one edge to the other. Take the largest measurement. Add 80mm to this measurement (40mm each side for the frame). 3.2 Measure the height (H) on the left and the right from the top edge to the bottom edge of the window frame. Take the largest measurement. Add 80mm to this measurement (40mm each side for the frame).
Note: If you have a windowsill that protrudes, take the measurement for the height and add only 40mm. This way the frame will run evenly around 3 sides of your recess and along the top of your windowsill.
plantation shutters height info
Minimum Height 350mm - Maximum Height 2600mm
Recess Fit
1. Measurements are required to be in millimeters (mm).
2. The depth of the reveal where the shutter or frame will be mounted needs to be measured, to ensure no mullions, handles or key locks etc. will interfere with the operation of the blades when open. When ordering with Hidden tilt rods, measured from the front edge of the frame, 89mm blades need 67mm, 63mm blades need 55mm
3. This depth will then determine the framing options available to suit the requested blades.
4. Measuring for inside reveal (recess) fit the shutters should be measured in three places across the width and the drop and the smallest measurements provided.
Face Fit
1. Measurements are required to be in millimeters (mm).
2. When ordering Face (outside) Fit shutters it is suggested to use the matching frame sizes to ensure the blades clear any architraves or walls that the frames are being mounted to.
3. Measuring for outside (face) fit the shutters should be measured in three places across the width and the drop and the largest measurement provided where the outside of the shutter frame is to be installed.
4. If the opening has an architrave the OUT measurements are usually from the outside of the architrave, to the outside of the opposite architrave. If there is no architrave, add the width of the frame to the recess measurement to find the outside of frame measurements.
Mid Rail is required on Panels over 1500mm.
Mid Rail(s) (when required) will be placed at even spacings on the Panel
unless otherwise requested.
For Shutters in a frame, please measure from the bottom of the opening
to the centre of the Mid Rail(s)
For Panels only, please measure from the bottom of the Panel
to the centre of the Mid Rail(s)
Only one Critical Midrail is allowed.
Mid rail height
On panels over 1500 in height, a mid-rail height is necessary for stability. We will put it in the centre of the panel, but if you want to align it with something like a window sash, provide a measurement from the bottom of your window to the middle of the obstacle.
Measure the hard drop from the left, centre, and right of the window recess. Write down the smallest width and drop measurement. Note; Special attention should be given to window openings that have window winders, latches, security devices, removable screens, etc, because they may obstruct the frame.
*Do not take any deductions (U Blinds Online will do this for you)
awnings height info
Folding Arm Awnings - Height info
awnings width info
Folding Arm Awnings - With Info details
free sample
We offer FREE Samples from each of our ranges at no obligation. This allows you to see the quality of our products for yourself so you can buy your window blinds online with confidence. We will post free window blind samples to anywhere in Australia at no charge.
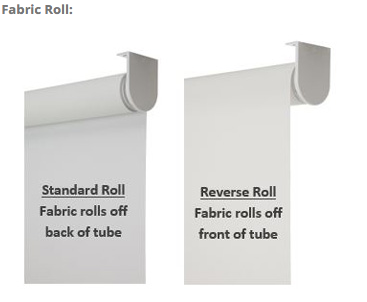
fabric roll
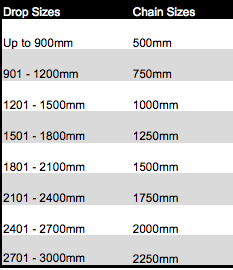
chain design

White Ivory Black Metal Stainless steel
White, ivory and black chains are supplied in plastic
*Please note if you live near the coast we recommend Stainless Steel Chains*
*A surcharge applies for stainless steel*
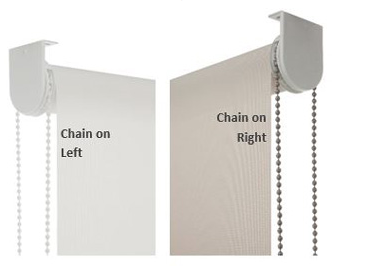
chain position
Which side of the bracket would you like the chain?
bracket type
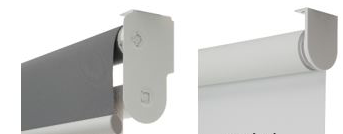
Dual Bracket | Single Bracket
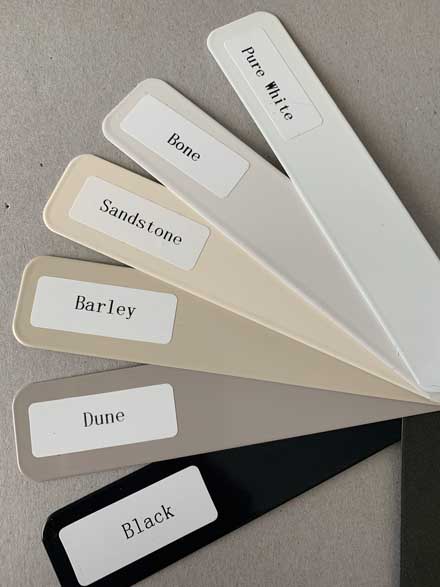
bracket colour
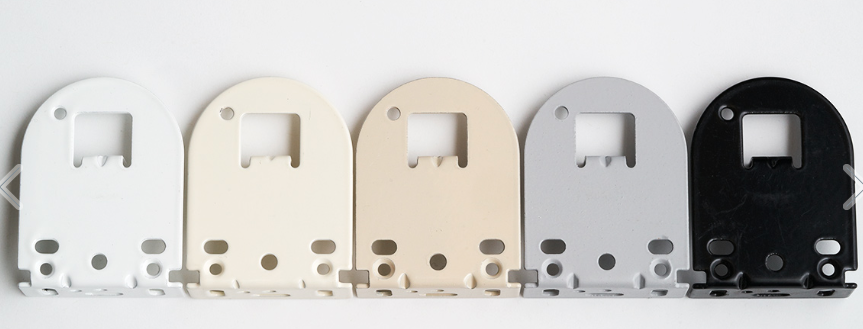
White | Sandstone | Barley | Grey | Black
fitting
louvre size

63mm
89mm - ½ times more view with 89mm blades
control type
colours
panel quantity
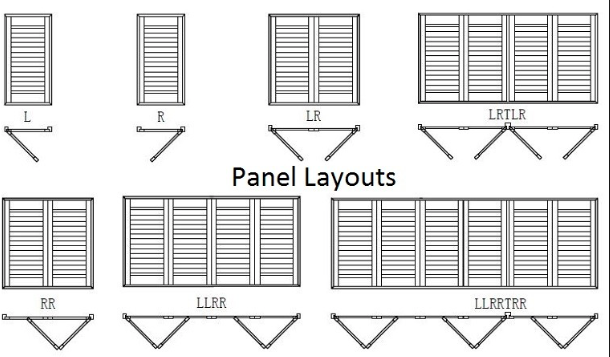
General Layouts
Panel Quantity is the number of panels within the opening
Depending on the number of shutters in your window you can choose from a number of different layouts to get the effect you desire. Please note that the available layouts are dependant upon your window width and drop. Shutters are split into panels. If your window is wider than approx 950mm, you will be required to add a second panel. You can select as many panels as you like, provided the panels are between 350mm and 900mm. We recommend matching the layout of your window.
P - Panels | T - T-post | L - Left | R - Right
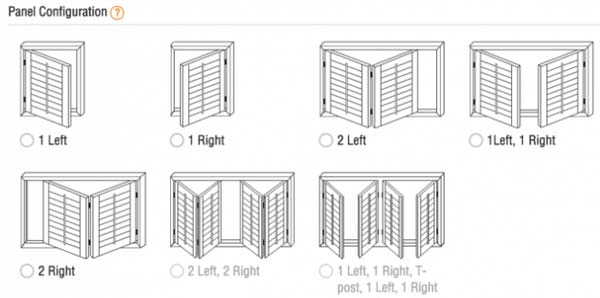
opening options
install
Reveal
In this scenario, the shutter will sit inside the window frame. This is generally considered the most modern, streamlined, mounting option 1.1 Measure the width (W) inside the window frame from one edge to the other at the top, middle, and bottom of the window frame. Record the smaller of the three measurements. 1.2 Measure the height (H) from the top edge to the bottom edge in the left, middle and right side of the window frame. Record the smaller of the three measurements. 1.3 Measure the minimum depth of the window frame. Refer to the section below for minimums requirements.
Note:
- The minimum depth is the smallest distance to the outside edge of the frame including any objects in the window such as handles or sliding door frames.
- The minimum depth needed for inside mount depends on the blade size of the shutter
- 63mm blade size = 55mm minimum depth
- 89mm blade size = 68mm minimum depth
Facefit Mount (with Architraves)
In this scenario, the shutter L-Frame will attach on top of the exiting architraves. 2.1 Measure the width (W) from one edge to the other at the top and bottom of the window to ensure the architraves are parallel. If the difference between the measurements is more than 5mm, shutter will not be a suitable option. 2.2 Measure the height (H) from one edge to the other on both the left and right of the window frame. If the difference between the measurements is more than 5mm, shutter will not be a suitable option.
Facefit Mount (No Architraves)
In this scenario, the shutter L-Frame will attach directly to the wall around the window 3.1 Measure the width (W) inside the top and bottom of the window frame from one edge to the other. Take the largest measurement. Add 80mm to this measurement (40mm each side for the frame). 3.2 Measure the height (H) on the left and the right from the top edge to the bottom edge of the window frame. Take the largest measurement. Add 80mm to this measurement (40mm each side for the frame).
Note: If you have a windowsill that protrudes, take the measurement for the height and add only 40mm. This way the frame will run evenly around 3 sides of your recess and along the top of your windowsill.
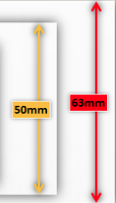
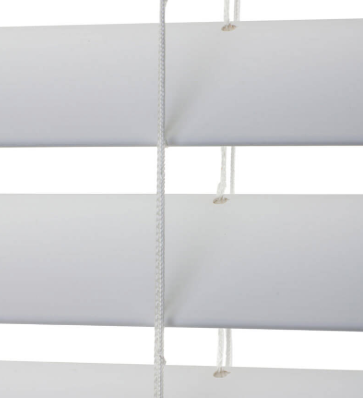
slat size
50mm | 63mm
Slat Size refers to the width of the Slat/Blade.
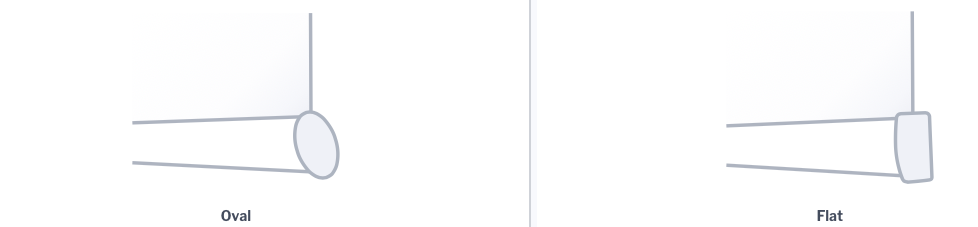
base rail shape
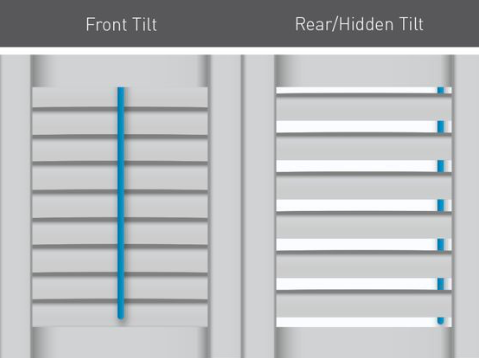
cord position
Cord lock is supplied on the right - tilt mechanism is supplied on the left
bottom rail colour
vibration sensor
Your awnings will adjust automatically to weather conditions thanks to the vibration sensor.
additional rafter brackets required
If installing into eaves or roof, make sure you are aware of the structural support on the inside, and consider the need for rafter brackets for additional support. Rafter brackets are fitted onto the roof rafters and require a cut-out in the structure to feed through the roof fascia before being secured to the timber rafter.
select a size
Measuring for your new Barcelona awning couldn’t be easier. Check the span of your outdoor area to see if you have room for the length of the 3.5m, 4.5m or 5.5m awning. Remember that all awnings open to a span of 3m, however, you can set the limit to less than that if necessary.
When measuring for installation into brick, you will need at least 5 bricks above where the awning will be installed for structural support.
colour
spring assist
To assist lifting heavier blinds, attach an Easy-Lift spring assist to reduce user effort.
830mm is the minimum width for spring assist. We recommend all Roller Blinds over 2000mm or 2 metres wide be ordered with a hidden part (concealed inside the blind or tube) called a Spring Assist
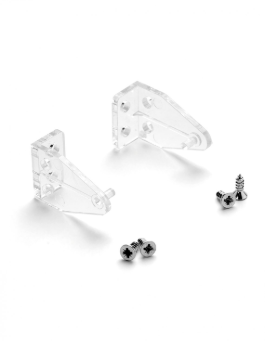
hold down
With easy installation the Hold Down Clip is designed to hold venetian blinds in place and prevent them from swinging.
If requesting hold downs the base rail and first bottom slat will be cut to fit the hold down bracket in on installation.
mounting method
Installation options include, Fixed In Place and Hinged
Fixed
Panels are fixed in position so that the blades can open and
close but the panels are held in place without hinges.
Hinged
Hinged Panels are the best option for windows and are the most popular form of shutters used. When ordering with frames, frames are supplied and non-mortise hinges link the panels to the frame.

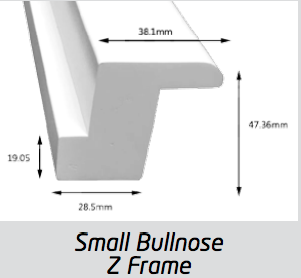
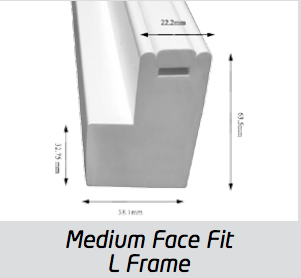
frame
critical mid rail
Mid Rail is required on Panels over 1500mm.
Mid Rail(s) (when required) will be placed at even spacings on the Panel
unless otherwise requested.
For Shutters in a frame, please measure from the bottom of the opening
to the centre of the Mid Rail(s)
For Panels only, please measure from the bottom of the Panel
to the centre of the Mid Rail(s)
Only one Critical Midrail is allowed.